

How To Repair Bottom Door Seal
How to Winterize Your Garage Door
Updated: Sep. 20, 2022
Restore your garage door bottom seal past installing new weather seals, replacing rotted trim and renewing a rusty runway.
Make weather-tight garage door seals, supplant rotted trim with maintenance-free vinyl and clean upwardly a rusty runway. Exercise it yourself and save a bundle.
You lot might also similar: TBD
Repair I: Weather Seal Your Garage Door Bottom Seal
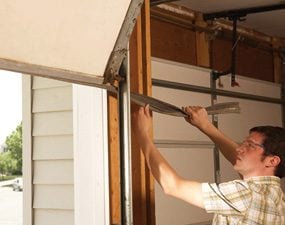
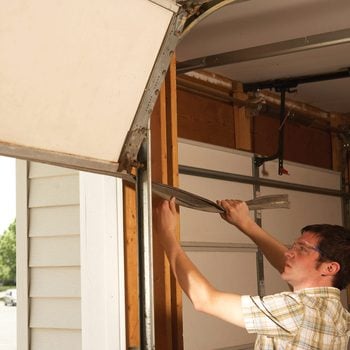
Photo 1: Remove the Old Garage Door Seal
Lift the garage door to well-nigh six feet high and pull the old garage door lesser seal out through the gap backside the door track.
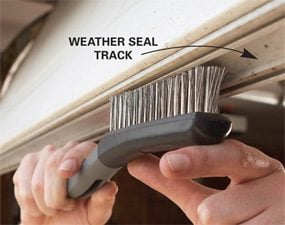
Photo two: Clean the Rail
Scrape dirt and corrosion out of the garage door bottom sealtrack with a screwdriver and a potent castor.

Photo 3: Install the New Seal
Lubricate the condom with a few drops of dish soap, then push and pull the new garage door bottom seal into the track.
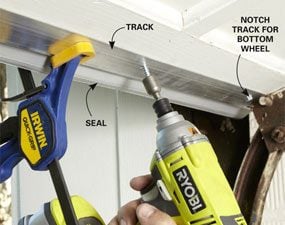
Photo four: Spike a New Garage Door Bottom Seal To a Wood Garage Door
Push the track into wet caulk and tight against the door lesser. Clamp it into place. Then drill and spiral the track to the back of the door using ane-inch screws.
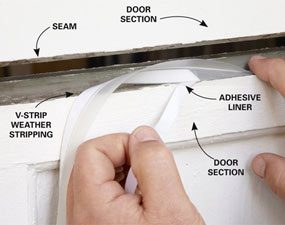
Photograph 5: Utilize Garage Conditions Stripping Between Door Sections
Cutting the garage atmospheric condition stripping into strips the width of the door. Then fold forth the crease and then the "V" faces the outside. Insert the strip between the door sections, remove the adhesive backing and press it into identify.

Photograph 6: Glue Downwardly a New Threshold
Squirt out a bead of threshold adhesive co-ordinate to characterization directions. Then motion the threshold into place and align it with the chalk line you made earlier. Close the garage door bottom seal and let the weight concord it in position until the adhesive sets upwards.

Photo 7: Nail on Self-Sealing Door Cease
Slide the door finish against the garage door so the vinyl seal bends at virtually a 45-degree bending. Then nail the end into identify with galvanized (or aluminum) 1-one/2-in. nails.
If you want to proceed the heat in your garage this winter or retain the cooled air next summertime, y'all'll have to do more than simply install an insulated door. Most of the conditioned air escapes around and through all the cracks.
Hither are four simple ways to seal your garage door every bit much every bit possible. Yous can exercise the whole garage door bottom panel replacement job in an afternoon for as little equally $100, depending on the size of the door.
Measure out the Garage Door for the Seal
Outset by measuring the width, top and thickness of your garage door. You'll need those measurements to buy a garage door stop with a born sealing lip and a new garage door bottom seal. While you're at the dwelling eye, buy V-strip weather stripping, a tube of outside caulk and a modest tin can of woods sealer (if you take a wooden door). And for extra sealing power, buy a rubber threshold.
Some garage doors come with a metal track that holds a replaceable rubber seal. Over fourth dimension, the seal flattens and cracks. If that's what you have, replace it with a "cold conditions" silicone-type seal, which remains flexible in cold atmospheric condition and lasts longer. Lubricate the silicone seal with dishwashing detergent and slide information technology into the track slots.
Remove the Quondam G arage Door Lesser Seal
Lift the door just enough and then the garage door rail doesn't arrive the style of the weather seal, then slide out the erstwhile rubber bulb (Photo 1). You may demand to pry the rails ends open with a flat screwdriver if they've been crimped. If it's particularly stubborn, cut information technology and remove it in pieces.
Make clean the door bottom (Photo 2), then cutting the new rubber seal to length with a razor knife. Thread the T-shaped edges into the conditions seal track, and so slide the seal across the door. Exist patient — information technology takes a lot of pushing and pulling even with a helper.
If yous accept a wooden garage door, rip off the nailed rubber seal. And so seal the wood with wood sealer. While the sealer dries, prepare the new aluminum rails by cutting information technology to length and notching the ends so it fits effectually the bottom roller. Adjacent, lay down a thick bead of caulk along the leading edge of the door and attach the track setup (Photo 4).
Set up the areas between the door sections by cleaning them with a rag and household cleaner (be careful non to pinch any fingers). Then install the pressure-sensitive V-strip conditions stripping (Photo 5). Repeat for each section.
Install the Threshold
Now move on to the threshold. Start by cleaning the concrete with degreaser and water. Rinse and allow dry. Then roll the threshold into place with the hump on the within of the garage door and cutting to the width of the opening.
Gently shut the door onto the threshold and square upwards the hump to meet the door seal. Marking the edge of the threshold on the floor at each cease and snap a chalk line along your marks. Next, glue the threshold into place. Close the door firmly confronting the threshold and get out it closed until the adhesive dries (Photo half-dozen).
Install The Cease
Pry off the sometime door terminate and install new door terminate that has a sealing lip (Photo 7). Plus, these are the things to know earlier buying a garage door.
Seal a Garage Door Gap, Part Two
Hither's how to deal with gaps caused by an uneven lesser door panel or sunken concrete.
The easiest just least elegant method is to install several pieces of lesser seal retainer and rubber gasket in the gap areas. Just measure the thickness of your bottom panel and buy sections of seal retainer and gasket from a garage parts supplier. Mount the retainer to the lesser panel wherever there's a gap. Finish the job by sealing the peak edge of the retainer with caulk and then paint to friction match the door. This gear up works on wood and metal doors.
If you have a wood door and want a cleaner look, remove the existing bottom seal and scribe/cutting the lesser console to match the contour of the physical flooring. Seal the freshly cut wood with woods sealer. Then remount the bottom seal.
Repair Two: Supplant Rotting Garage Door Trim
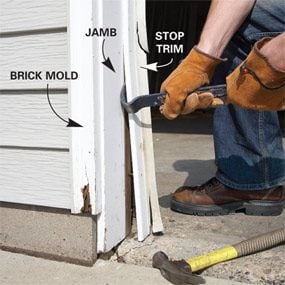
Photo 1: Remove the Old Garage Door Trim
Cut through any caulk lines with a utility knife, then pry off the quondam garage doorstop, brick mold and jamb.
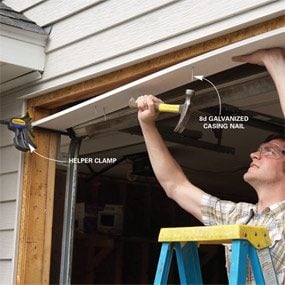
Photo 2: Install the New Jamb
Use a clench to hold upward i stop of the top jamb, so blast the jamb to the framing with 8d galvanized casing nails.
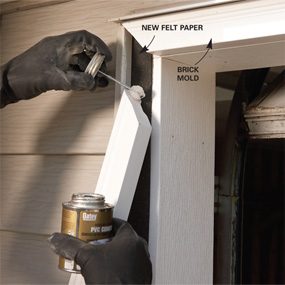
Photo iii: Glue and Nail Brick Mold
Spread PVC cement on both sides of the mitered corners, then agree them together until they bail.

Photo iv: Add Stop Molding
Mark the width of the trim piece at several points on the jamb, then nail. Trim the overlapping safe seal at the corners.
Wood garage door jambs and trim often rot well-nigh the bottom or become crunched past bumpers.
A skillful, long-lasting solution is to replace the wood jamb, brick mold trim and doorstop with paintable solid vinyl pieces that won't crack or decay. The vinyl can be cut, nailed and painted just like woods. It's available in white, but you can order brown, bronze and tan. Fill up boom holes with white caulk or exterior wood filler, then if desired prime number and pigment with acrylic latex. Use a light pigment colour over white vinyl to keep information technology from overheating.
Remove the sometime jamb and trim (Photo i), then nail the vinyl jamb to the frame, start with the acme piece (Photo 2). Fasten every 12 to 16 inches with 8d galvanized nails or stainless steel trim screws. Precut the miters on the meridian piece of brick mold trim and nail it to the framing every 12 inches with 10d galvanized casing nails. Use 6d casing nails for the finish molding, nailing it at the pre-marked points on the trim.
If the temperature is beneath 40 degrees F during installation, pre-drill blast holes and leave a 1/viii-in. gap at the ends of the jamb for expansion.
Gum the brick mold corners with PVC cement (Photo iii), so nail them into identify later the gum sets. To avoid breaking the articulation, wait at least an hour for the gum to fully cure before nailing within a foot of the corner. Splice long runs with glued barrel joints.
The edge of the vinyl stop molding should be 2-1/ii-in. back from the garage door so the rubber seal fits loosely against the door (Photo 4).
Repair Iii: Clean up a Rusty Door Track

Photo i: Trim the Rusty End
Mark the bottom of the track, then cut the metallic with a reciprocating saw or hacksaw.

Photo ii: Clean and Paint
Clean the bottom of the track with mineral spirits, wire-brush the rust, and then pigment the surface area.
Garage door tracks often rest directly on clammy concrete floors, where they somewhen rust. Yet, at that place's no reason they can't be slightly above the floor and stay dry. The garage rafters carry the weight of the track and the angle brackets concord the runway in place.
Clean up the tracks and forestall rusting by merely cutting off the bottom ane/2-in. First make sure all the bending subclass bolts are tight, then cut the track bottoms off (Photo 1). Use a rag dipped in thinner to remove whatever lubricant on the start six inches of track, and so scrape and brush off every bit much rust as you can. Finally, paint the bottom with a metallic spray paint that's formulated to bond to rusted areas (Photo ii). Rust-Oleum Rust Reformer is one choice.
Required Tools for this Garage Door Weather condition Stripping Project
Take the necessary tools for this DIY projection lined upwardly before you showtime — you'll save time and frustration.
Required Materials for this Garage Door Conditions Stripping Projection
Avert last-minute shopping trips past having all your materials ready ahead of fourth dimension. Here's a listing.
Originally Published: October 28, 2022

How To Repair Bottom Door Seal,
Source: https://www.familyhandyman.com/project/fixing-garage-door-bottom-seal/
Posted by: bergmanhison1971.blogspot.com
0 Response to "How To Repair Bottom Door Seal"
Post a Comment